Gradle 101: Core Concepts
As I’ve been working on some Android development projects lately, I had the chance to also learn more about Gradle. In case you don’t know, Gradle is a free and open-source build tool that helps developers build apps, not just for Android, but also for Java, Kotlin (including projects that work on different platforms!), Groovy, Scala, JavaScript, and even C/C++.
In this post, I’ll get into some basic concepts.
Directories
There are two level of root directories users might need to know about:
- Global level
- Project level
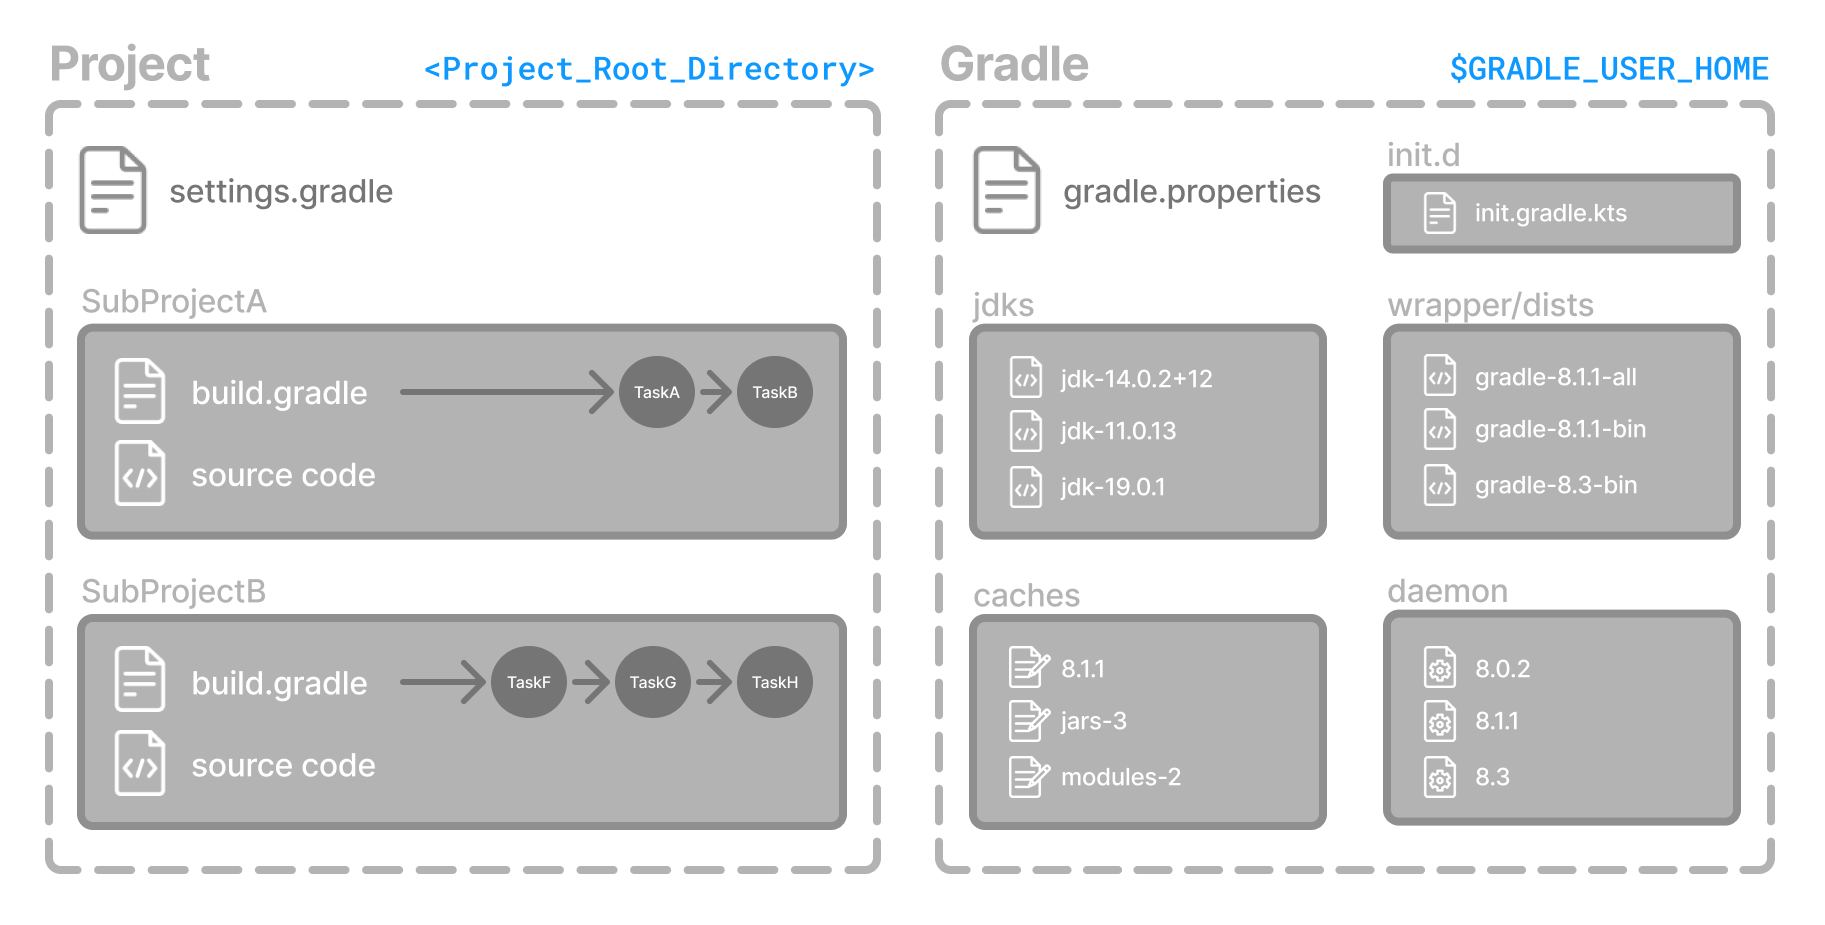
$GRADLE_USER_HOME is where global properties, initialization scripts and logs are stored.
This user home directory on my mac is located at the following path /Users/{username}/.gradle. Performing a ls on the directory gives me this:
caches
daemon
native
notifications
undefined-build
There are two important folders here, let’s take a look:
- caches: This is the globsl cache directory that is not project specific. Gradle automatically clean up the cache in the background when daemon stops or shutdowns.
- daemon: This is where deamon logs and registry data for each version stores. The Gradle Daemon is a long-lived background process that reduces the time it takes to run a build.
Build Lifecycle
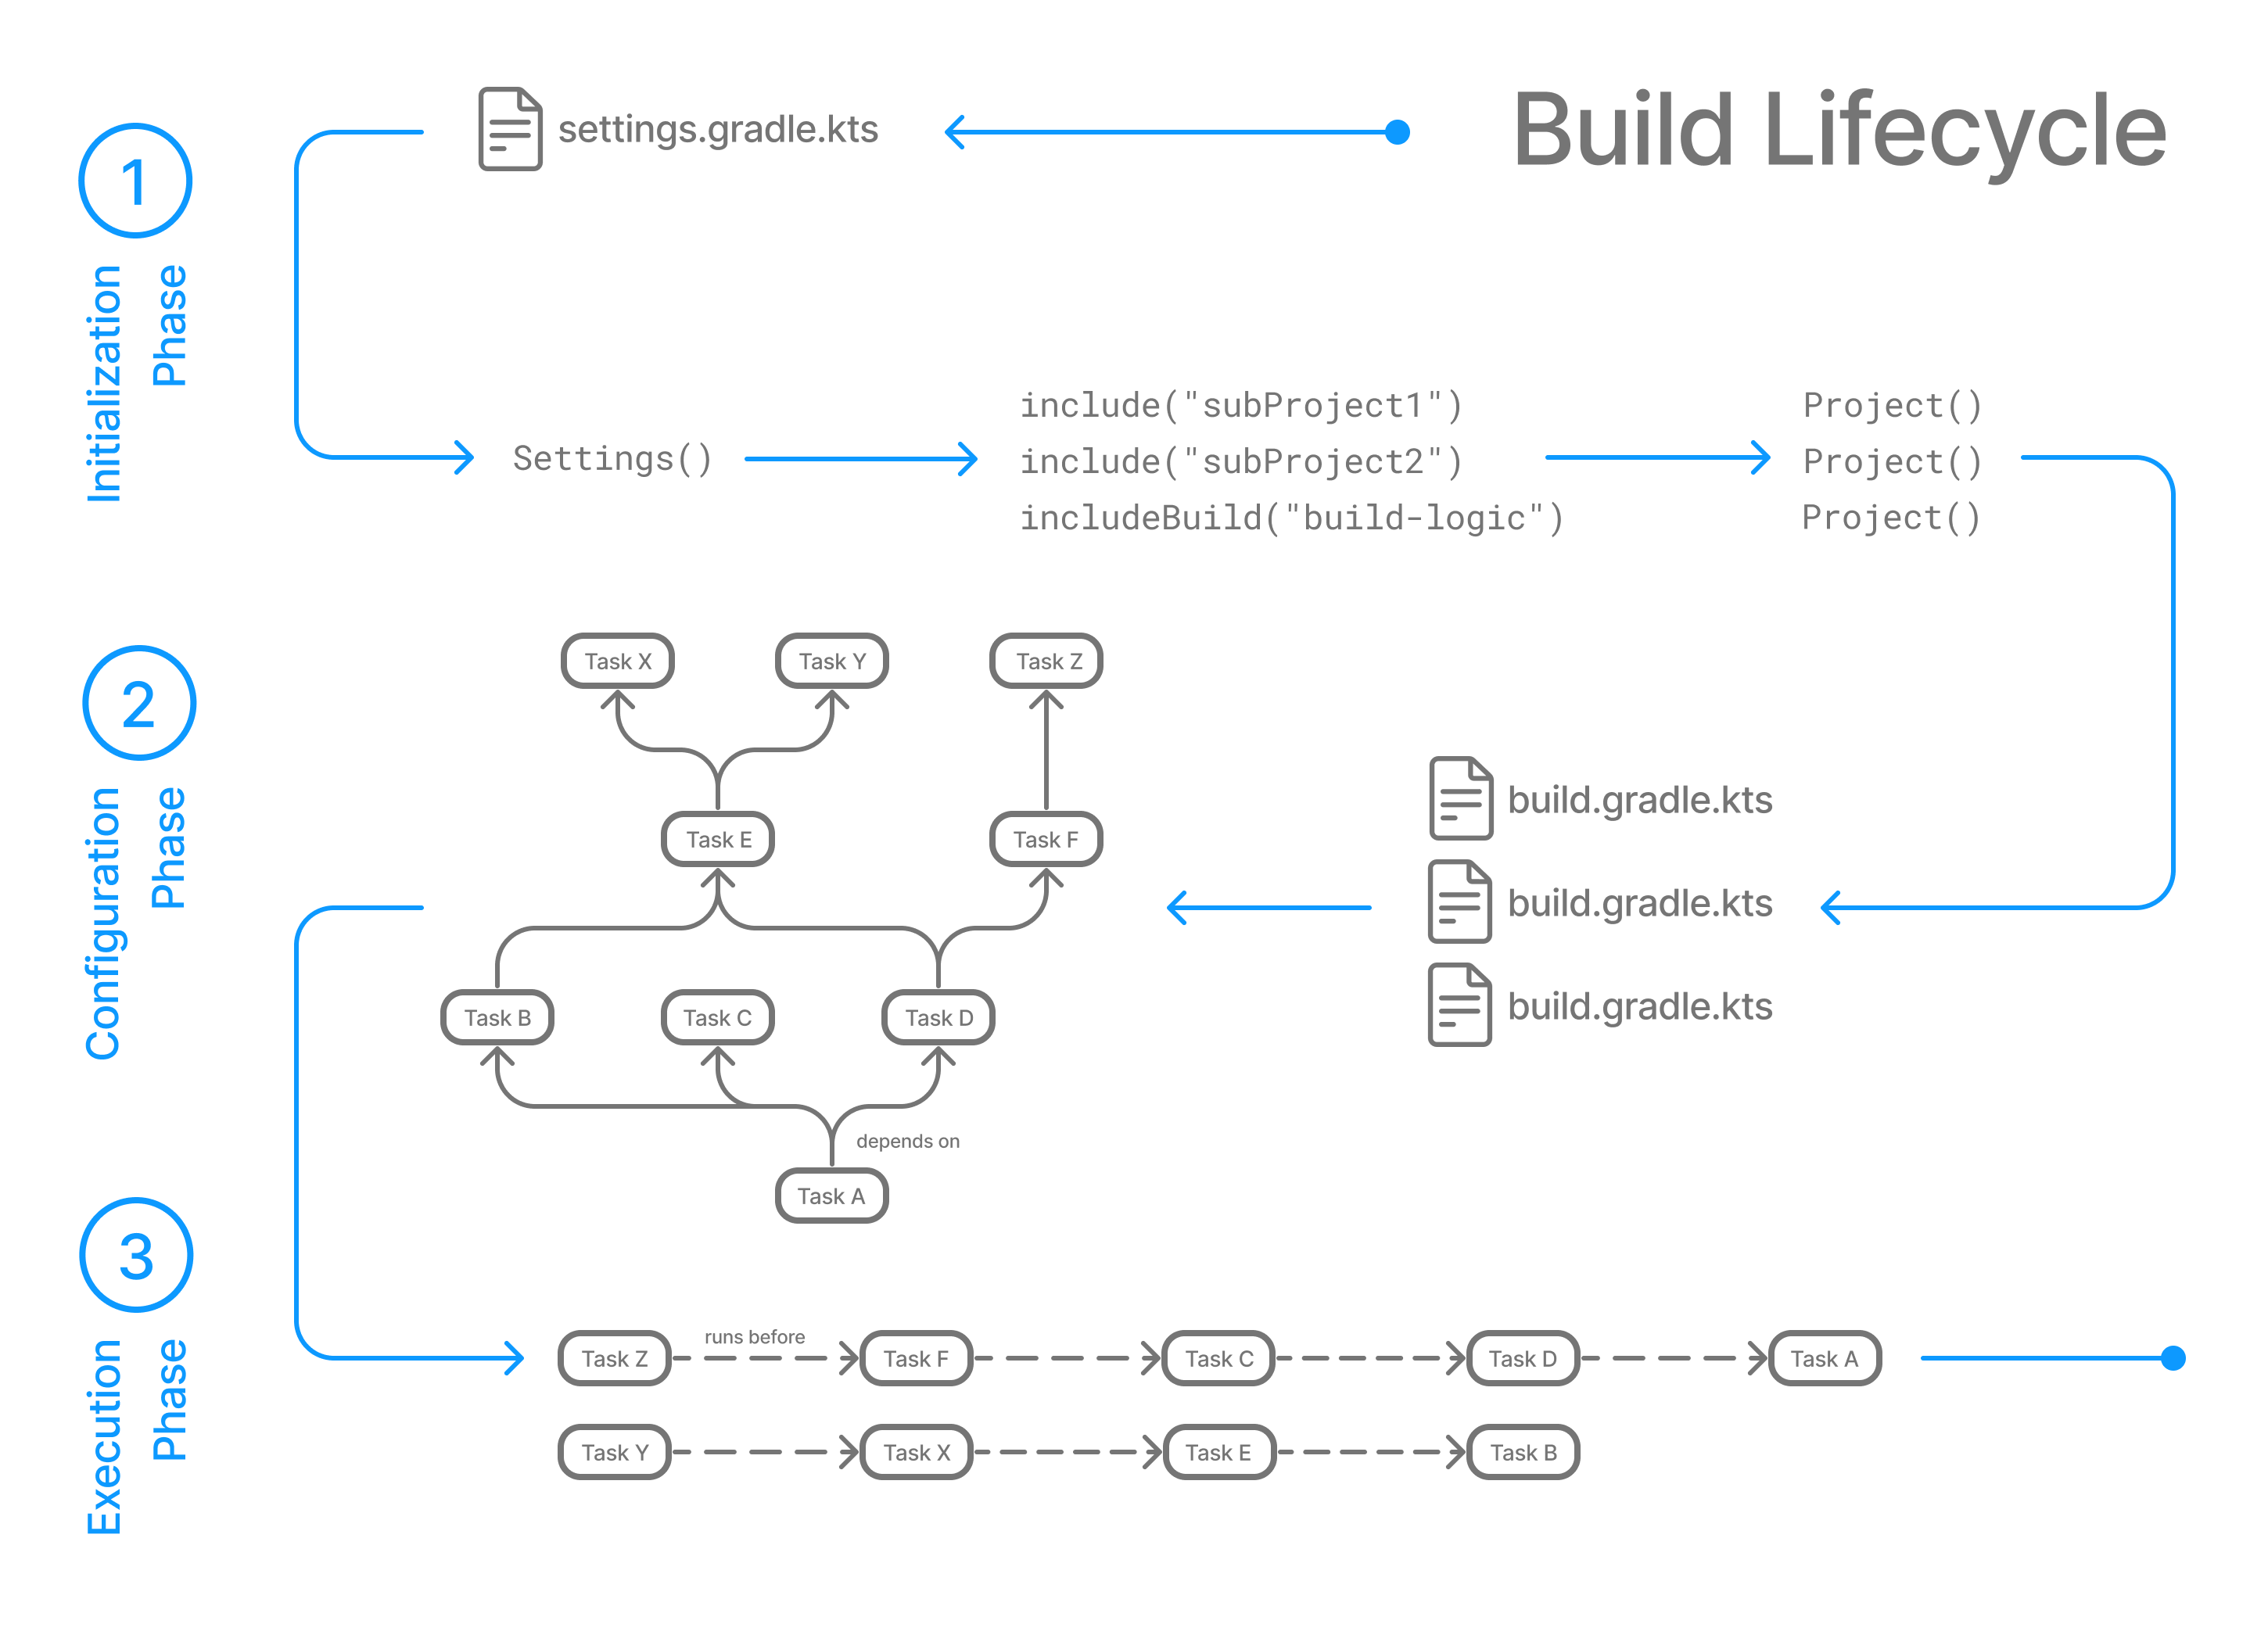
Running ./gradlew [task name] instructs Gradle to begin the build lifecycle. The build lifecycle consists of three phases:
- Initialization phase
- Configuration phase
- Execution phase
Phase 1. Initialization
- Detects the
settings.gradle(.kts)file. - Creates a Settings instance.
- Evaluates the settings file to determine which projects (and included builds) make up the build.
- Creates a Project instance for every project.
Phase 2. Configuration
- Evaluates the build scripts,
build.gradle(.kts), of every project participating in the build. - Creates a task graph for requested tasks.
Phase 3. Execution
- Schedules and executes the selected tasks.
- Dependencies between tasks determine execution order.
- Execution of tasks can occur in parallel.
Settings file
The settings file is the entry point of every Gradle build. The settings file is equivalent to settings object. The content of a typical settings.gradle can be something like this:
rootProject.name = 'root-project'

include('sub-project-a')
include('sub-project-b')
include('sub-project-c')
Root project name and the list of sub-projects are defined in the settings.gradleand Gradle build lifecycle will pick up that in the initialization phase.
Here are few important methods that can be used in Gradle settings file:
include
Using this method you can add sub-projects to the root. The method takes Path arguments which shouldn’t be mistaken by file path, instead they specify the location of the sub-project in the project hierachy. As such, the supplied paths must use the ‘:’ character as separator (and NOT ‘/’).
   // include two projects, 'foo' and 'foo:bar'
   // directories are inferred by replacing ':' with '/'
   include 'foo:bar'

   // include one project whose project dir does not match the logical project path
   include 'baz'
   project(':baz').projectDir = file('foo/baz')

   // include many projects whose project dirs do not match the logical project paths
   file('subprojects').eachDir { dir ->
     include dir.name
     project(":${dir.name}").projectDir = dir
   }
sourceControl
Using this method you can configure project’s source control. Look up SourceControl Interface for more information on what can be defined using this.
pluginManagement
PluginManagement can be used to defined the configurations for plugins including how to resolve them.
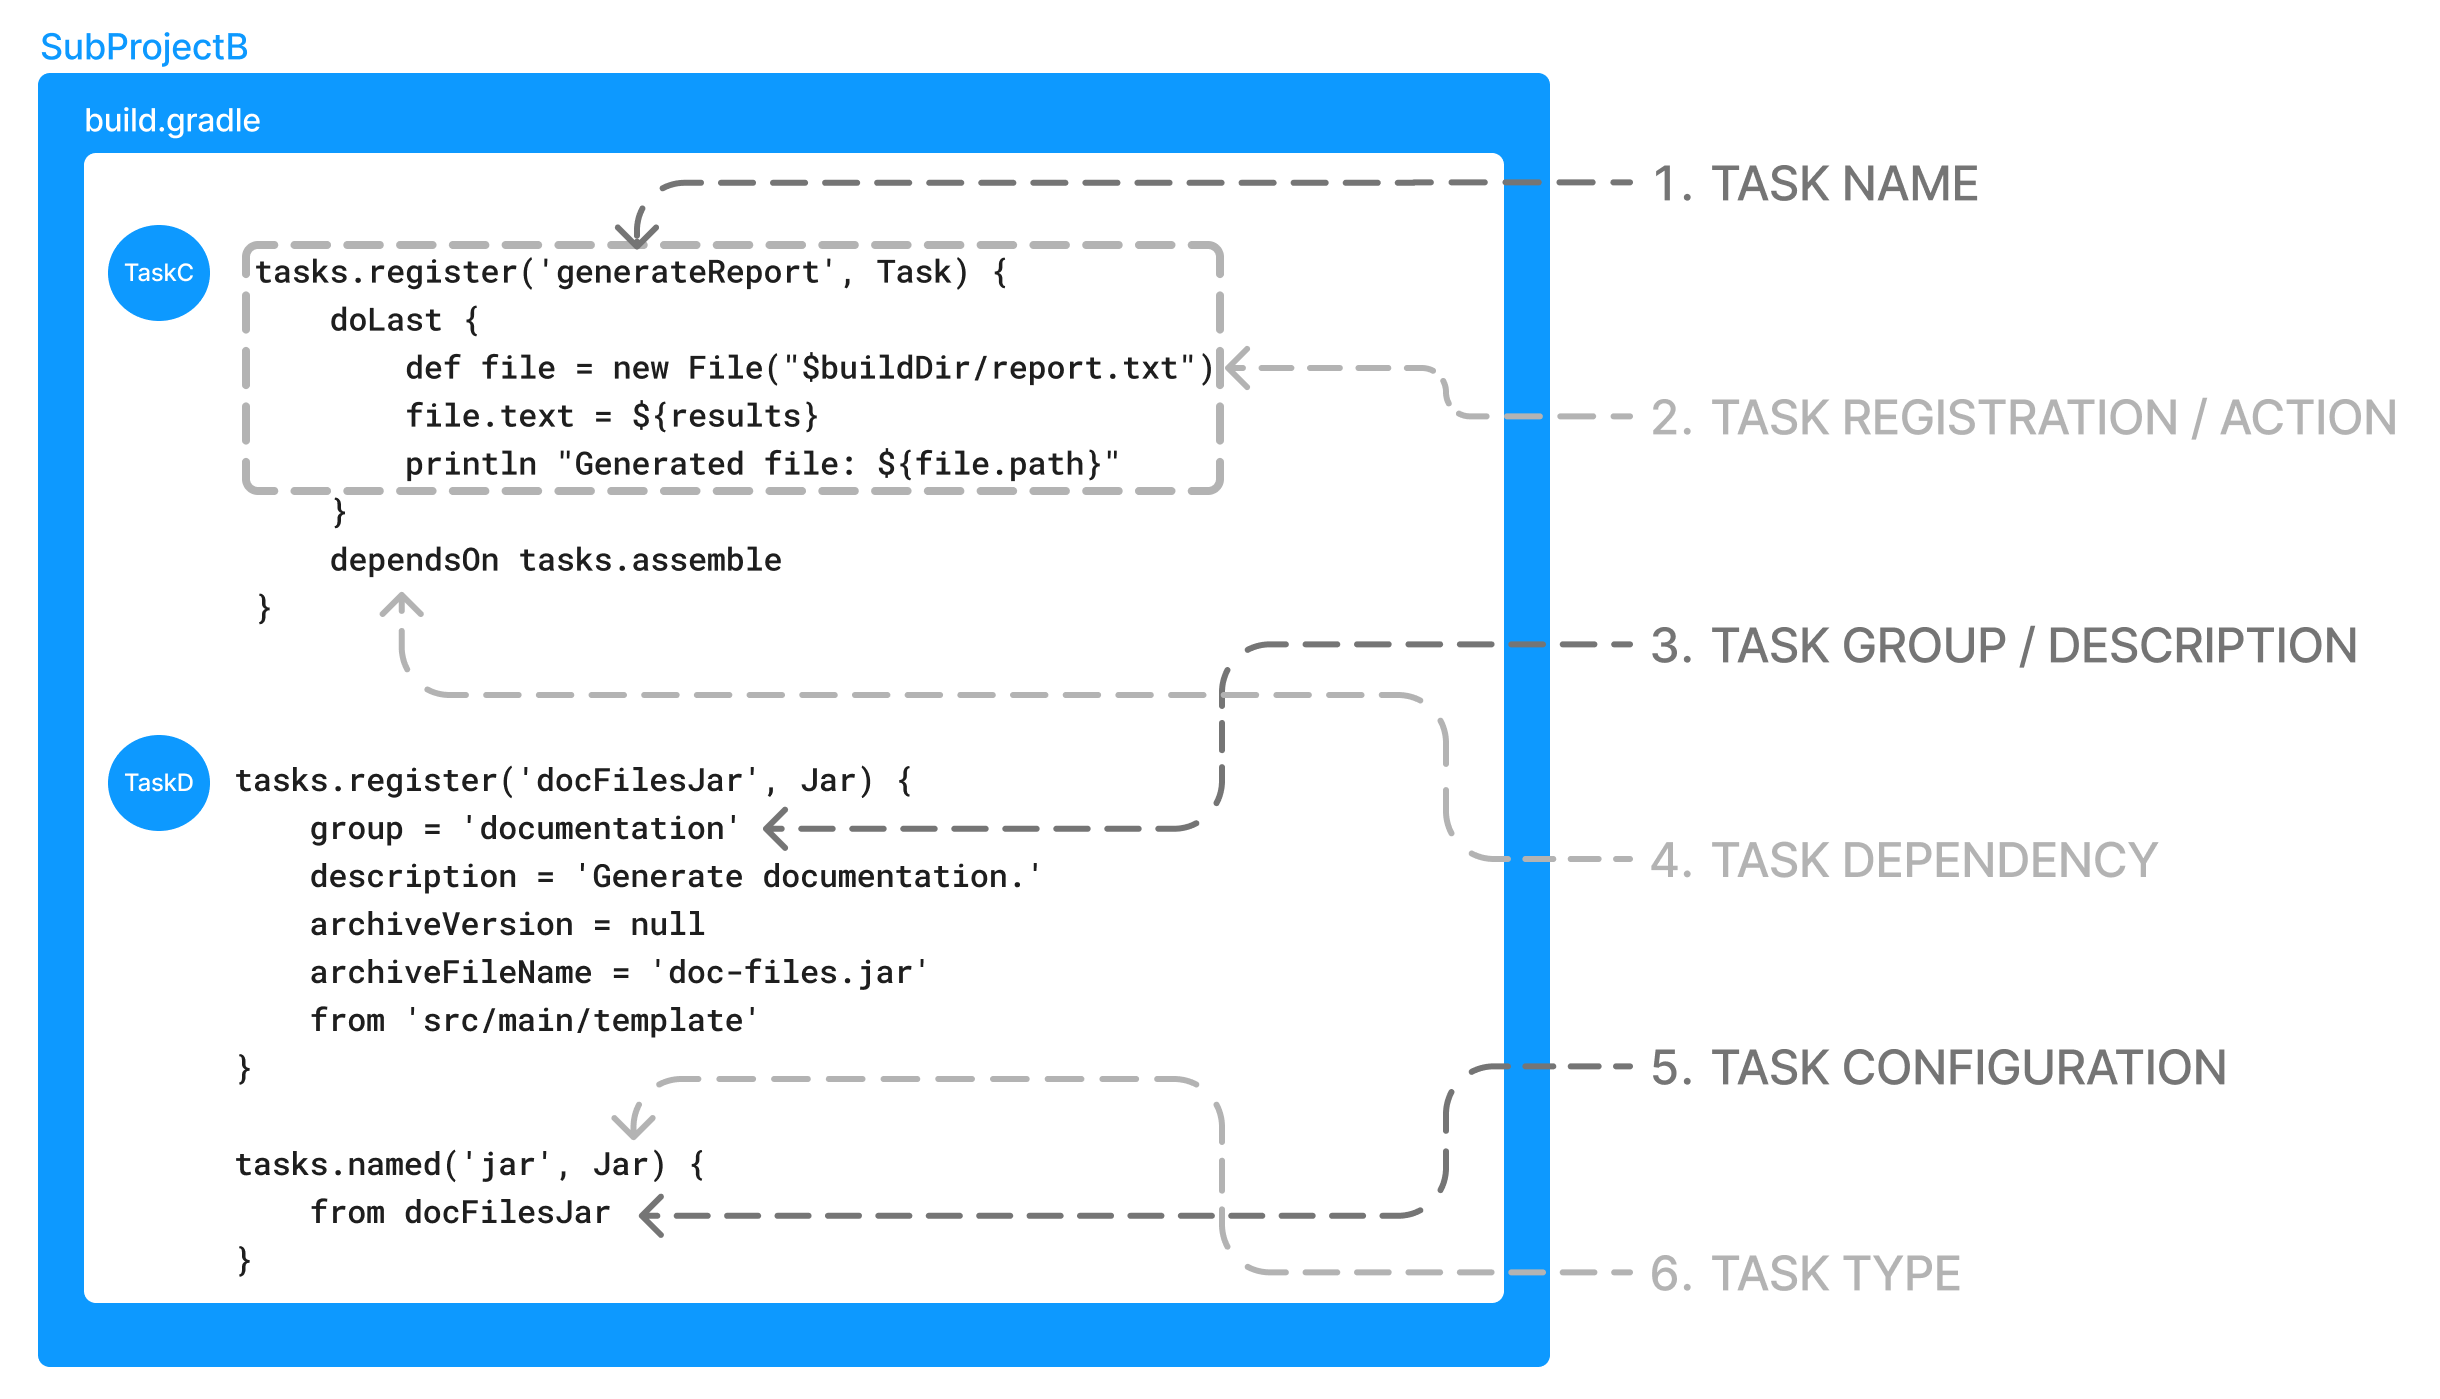
Tasks
Tasks are units of work that Gradle as a build tool can perform. This includes compiling java classes, running unit tests, generating code documents or packaging build artifacts.
Basicallly everything that a user runs via gradlew is a task. The syntax is as:
gradlew [task name]Even if you want to see the list of all tasks in a project, you can run a task for it!
gradlew tasks You can define a task by registring it, however this won’t create a task until it is needed! You pass the task name in order to register it.
tasks.register('hello') {
    doLast {
        println 'Hello world!'
    }
}
In the above example, a task named hello is defined. The task prints Hello World! at the end of its execution phase. The task will be created when you run:
$ ./gradlew hello
Hello world!
Let’s explore few options that the gradle’s Task provides:
- group: Tasks can be assigned to a specific group. The can be useful to categorize tasks and put similar tasks into one categary.
- description: Task description can give a brief information about what the task does. By setting the description, you can execute
helpcommand to get the information about a task.
$./gradlew help --task hello

> Task :help
Detailed task information for hello- type: Gradle tasks inherit from
DefaultTaskclass and this is determined their types. However user can create their own task class to implement a more customized logic.
// Extend the DefaultTask class to create a HelloTask class
abstract class HelloTask : DefaultTask() {
    @TaskAction
    fun hello() {
        println("hello from HelloTask")
    }
}

// Register the hello Task with type HelloTask
tasks.register<HelloTask>("hello") {
    group = "Custom tasks"
    description = "A lovely greeting task."
}- dependsOn: Using this attribute you can define the dependencies that this task requires before execution. For exmaple if you make a
TaskAas a dependency ofTaskB, when you rungradlew TaskB, it would first runTaskA.
tasks.register('hello') {
    doLast {
        println 'Hello world!'
    }
}
tasks.register('intro') {
    dependsOn tasks.hello
    doLast {
        println "I'm Gradle"
    }
}
$ gradle -q intro
Hello world!
I'm Gradle- doFirst: Adds a given action to the begining of the action’s list. The action performs in the execution phase.
- doLast: Adds a given action to the end of the action’s list. The action peforms in the execution phase.
tasks.register('hello') {
    doLast {
        println 'Print second!'
    }
    doFirst {
        println 'Print first!'
    }
}
$ ./gradlew hello
Print first!
Print second!- mustRunAfter: Using this attribute you can make your task to be always runs after the supplied tasks. In the example below, TaskX would run after TaskY and TaskZ.
tasks.register('TaskX') {
    mustRunAfter "TaskY","TaskZ"
}
Plugins
Plugins are the important part of Gradle. Using plugins you can defined a modular component that can be re-used and extend through different projects. They made gradle implementation lightweight and the user doesn’t need to reinvent the wheele if a build logic has been already presented in a plugin. There are 3 types of plugins in a gradle project:
- Core Plugins: A set of plugins that ship with Gradle.
- Community Plugins: Plugins that built by Gradle community and can be found in here.
- Custom Plugins: and lastly the plugins that can be locally made and customized by users.
Ok! let’s see an example of each types of plugins:
Core Plugin
Gradle comes with a list of core plugins that can be added to your build.gradle file.
The syntax for adding a core plugin to the project is:
plugins {
    id "plugin name"
}
A very common core plugin for Gradle is Java which provides support to build any types of Java project.
plugins {
    id java
}
After you add the plugin to the project, you can start using the tasks it includes. Here is the list of tasks that come with Java plugin:
- compileJava
- processResources
- classes
- compileTestJava
- processTestResources
- testClasses
- jar
- javadoc
- test
- clean
- cleanTaskName
For example, you can create JavaDoc artifact for a java project by running:
$ ./gradlew javadocCommunity Plugin
Gradle has an active community that develop and maintain Gradle plugin repository. If you want to drag a plugin from this portal to your project, first you need to defined the repository address that plugins will be fetching from. This can be defined in settings.gradle:
pluginManagement {
    repositories {
        gradlePluginPortal()
    }
}
In order to add a community plugin, you need to include version as well as id.
plugins {
    id("plugin name") version "number"
}
Let’s take Nexus project as an example. This plugin is for publishing to Nexus that automates creating, closing, and releasing staging repositories.
plugins {
  id("io.github.gradle-nexus.publish-plugin") version "2.0.0"
}
Custom Plugin
Sometimes you have a unique requirement that is not available in the core or community plugins. In that case, you can create your own custom plugin. Custom plugins can be either located inside $GRADLE_USER_HOME as a global level or in the root project folder as a project level plugin.
A custom plugin is any class that implements the Plugin interface. Here is a simple Hello World plugin:
import org.gradle.api.Plugin
import org.gradle.api.Project

abstract class SamplePlugin : Plugin<Project> {
    override fun apply(project: Project) {
        project.tasks.create("SampleTask") {
            println("Hello world!")
        }
    }
}
and then you can apply the local plugin to your build.gradle:
// Apply the local plugin
apply<SamplePlugin>()
Now that SamplePlugin applied, you can perform gradlew SampleTask to print Hello World!
And that’s all! I hope this post gave you a basic understanding of Gradle build tool.